By design the monome grid does nothing on it's own. You the user assign it purpose and meaning: instrument, experiment, tool, toy... choose your own adventure. This grid is intended to be reimagined. Here we set forth to impart some introductory knowledge: potential energy for radical creative freedom.
SuperCollider is an environment and programming language for real time audio synthesis and algorithmic composition. It provides an interpreted object-oriented language which functions as a network client to a state of the art, realtime sound synthesis server.
If you're very new to SuperCollider, it will be very beneficial to work through the 'Getting Started' tutorial which is within SuperCollider's help file documentation.
Download SuperCollider: supercollider.sourceforge.net
Download the monome installer: monome.org/docs/begin
Download the code examples here: github.com/monome/grid-studies-sc/releases/latest
Download the monom library:
github.com/catfact/monom/archive/master.zip
Copy to library to your SuperCollider class library folder:
The monom library facilitates easy connection and communication with grids. Connect to a grid with the following code:
~m = MonoM.new("/monome", 0);
// ...
~m.useDevice(0);
Here the first monome device found is attached. There needs to be a slight delay in between initalizing the new device and connecting to it. Starting up the server works fine:
~m = MonoM.new("/monome", 0);

s.waitForBoot({

~m.useDevice(0);
The arguments to the initializer are prefix and grid rotation.
The library communicates with serialosc to discover attached devices using OSC. For a detailed description of how the mechanism and protocol work, see monome.org/docs/tech:osc.
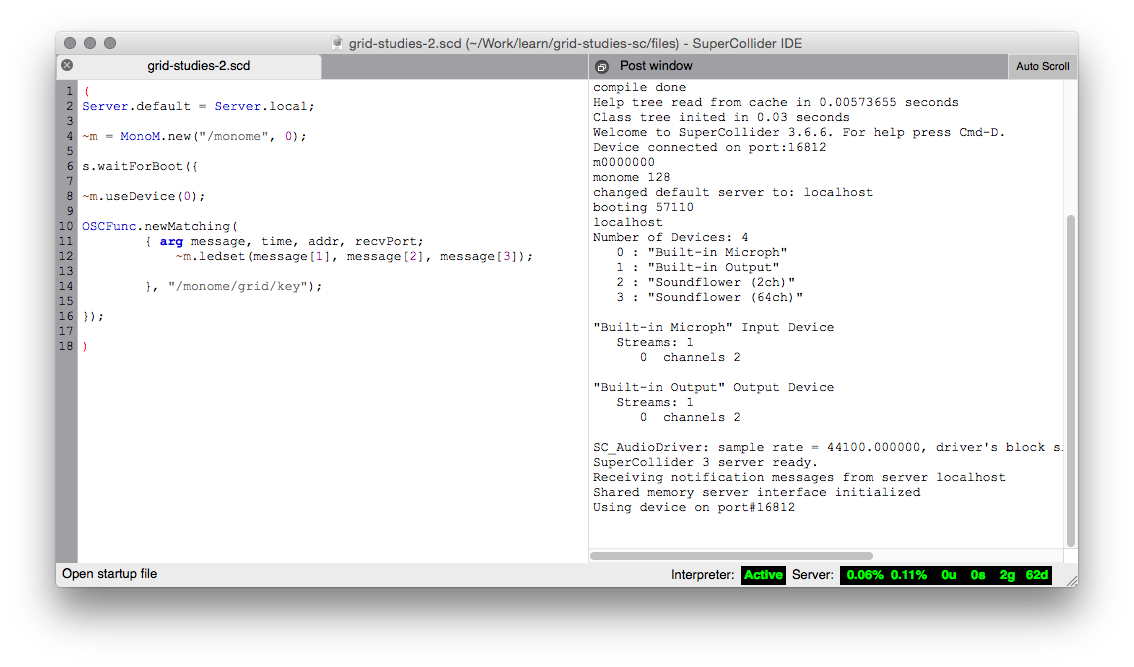
See grid-studies-2.scd for this section.
We read grid key input by creating an OSC responder. Three parameters are received, in order:
x : horizontal position (0-15)
y : vertical position (0-7)
s : state (1 = key down, 0 = key up)
Below we define the function and simply print out incoming data.
OSCFunc.newMatching(
        { arg message, time, addr, recvPort;
            message.postln;
        }, "/monome/grid/key");
/monome/grid/key is the OSC pattern this function responds to. We can later pull apart message to use the x, y, and s.
Updating a single LED takes the form:
~m.ledset(x, y, s);Where s ranges from 0 (off) to 15 (full brightness) with variable levels in between.
Instead of printing the key output, we can show the key state on the grid quite simply:
OSCFunc.newMatching(
        { arg message, time, addr, recvPort;
            ~m.ledset(message[1], message[2], message[3]);
}, "/monome/grid/key");See grid-studies-2-4.scd for this step.
The most basic decoupled interaction is a toggle. Turn the grid into a huge bank of toggles by first creating an Array to store data. It needs to be the same size as our grid. We'll call this step and initialize it full of zeros.
~step = Array.fill(128, {0});Now we need our key input code to switch the states. Instead of updating a single LED, we do this:
if(message[3] == 1, {
                var pos = message[1] + (message[2] * 16);
                if(~step[pos] == 1,
                    {~step[pos] = 0},
                    {~step[pos] = 1}
                );
                d.value;
            })
message[3] is the key state (down or up). Here we do something only on key down (value == 1). We calculate the position, and then change the value of the step based on its previous state.
We refresh the grid in function d which is executed with d.value;:
d = {
        for(0,7, {arg y;
            for(0,15, {arg x;
                ~m.levset(x,y,~step[y*16+x] * 15);
            })
        })
    };
Here we traverse the array, updating each LED in according to its value. We multiply by 15 which gives us 0 (off) or 15 (full brightness) per position.
Now we'll show how basic grid applications are developed by creating a step sequencer. We will add features incrementally:
We already have a full bank of toggles set up. Let's shrink down the bank to just the top 6 rows. First step can be reduced to 96 elements. And then we'll adjust the key detection so toggling only happens if y is less than 6:
    if((message[3] == 1) && (message[2] < 6), {
        var pos = message[1] + (message[2] * 16);
        if(~step[pos] == 1,
            {~step[pos] = 0},
            {~step[pos] = 1}
        );
        d.value;
    });
That will get us started.
See grid-studies-3-2.scd for this step.
Let's make a timer routine that moves a virtual playhead.
t = Routine({
    var interval = 0.125;
    loop {
        if(~play_position == 15,
                {~play_position = 0;},
                {~play_position = ~play_position + 1;}
            );

        d.value;

        interval.yield;
    }

});

t.play();
This routine runs at a timing interval specified by the variable interval. The play_position is advanced, rolling back to 0 after 15. We redraw the grid each time the play head moves.
For the redraw we add highlighting for the play position. Note how the multiply by 15 has been decreased to 11 to provide another mid-level brightness. We now have a series of brightness levels helping to indicate playback, lit keys, and currently active keys:
d = {
        var highlight;
        for(0,15, {arg x;
            if(x==~play_position,
                    {highlight = 1},
                    {highlight = 0});

            for(0,5, {arg y;
                ~m.levset(x,y,(~step[y*16+x] * 11) + (highlight * 4));
            });
        })
    };
During this loop which copies steps to the grid, we check if we're updating a column that is the play position. If so, we increase the highlight value. By adding this value during the copy we'll get a nice effect of an overlaid translucent bar.
See grid-studies-3-3.scd for this step.
When the playhead advances to a new row we want something to happen which corresponds to the toggled-on rows. We'll do two things: we'll show separate visual feedback on the grid in the second-to-last (trigger) row, and we'll make a sound.
Drawing the trigger row happens in d:
d = {
        var highlight;
        for(0,15, {arg x;
            if(x==~play_position,
                    {highlight = 1},
                    {highlight = 0});

            for(0,5, {arg y;
                ~m.levset(x,y,(~step[y*16+x] * 11) + (highlight * 4));
            });

            // set trigger row background
            ~m.levset(x,6,4);
        });

        // show triggers
        for(0,5, {arg t;
            if(~step[(t*16) + ~play_position] == 1,
                {~m.levset(t,6,15);}
            )
        })
    };
First we create a dim row (level 4 is fairly dim). Then we search through the step array at the current play position, showing a bright indicator for each on state. This displays a sort of horizontal correlation of rows (or "channels") 1-6 current state.
And then trigger a sound, if the toggle is on, inside t:
// TRIGGER SOMETHING
for(0,5, {arg t;
    if(~step[(t*16) + ~play_position] == 1,
            {Synth(\singrain, [freq: (5-t)*100+300,
                amp: rrand(0.1, 0.5), sustain: interval * 0.8]);}
    )
});
If step is 1 for at play_position we trigger a sound. The frequency corresponds to the row position.
See grid-studies-3-4.scd for this step.
We will now use the bottom row to dynamically cut the playback position. First let's add a position display to the last row, which will be inside d:
// play position
        ~m.levset(~play_position,7,15);
We clear this row first, a few lines prior.
Now we look for key presses in the last row, in the key function:
OSCFunc.newMatching(
        { arg message, time, addr, recvPort;

            if((message[3] == 1) && (message[2] < 6), {
                var pos = message[1] + (message[2] * 16);
                if(~step[pos] == 1,
                    {~step[pos] = 0},
                    {~step[pos] = 1}
                );
            });

            if((message[3] == 1) && (message[2] == 7), {
                ~next_position = message[1];
                ~cutting = 1;
            });
        }, "/monome/grid/key");
We've added two variables, cutting and next_position. Check out the changed code where we check the timer:
if(~play_position == 15,
        {~play_position = 0;},
        {
            if(~cutting == 1,
                {~play_position = ~next_position; ~cutting = 0;},
                {~play_position = ~play_position + 1;})
        };
    );
Now, when pressing keys on the bottom row it will cue the next position to be played. Note that we set cutting = 0 after each cut so that each press only affects the timer once.
See grid-studies-3-5.scd for this step.
Lastly, we'll implement setting the loop start and end points with a two-press gesture: pressing and holding the start point, and pressing an end point while still holding the first key. We'll need to add a variable to count keys held, one to track the last key pressed, and variables to store the loop positions.
~keys_held = 0;
~key_last = 0;
~loop_start = 0;
~loop_end = 15;
We count keys held on the bottom row thusly:
if(message[2] == 7,
    if(message[3] == 1,
        {~keys_held = ~keys_held + 1;},
        {~keys_held = ~keys_held - 1;});
);
We'll then use the keys_held counter to do different actions:
// loop and cut
if((message[3] == 1) && (message[2] == 7), {
    if(~keys_held == 1, {
        ~next_position = message[1];
        ~cutting = 1;
        ~key_last = message[1];
        },
        {
            ~loop_start = ~key_last;
            ~loop_end = message[1];
            ~loop_end.postln;
    });
});
We then modify the position change code:
// update position
if(~cutting == 1,
        {~play_position = ~next_position; ~cutting = 0;},
        {
            if(~play_position == 15,
                {~play_position = 0;},
                {
                    if(~play_position == ~loop_end,
                        {~play_position = ~loop_start;},
                        {~play_position = ~play_position + 1;});
                }
            );
        };
    );
Done!
SuperCollider was written by James McCartney and is now maintained as a GPL project by various people.
monom was originally written by Raja and is maintained by Ezra Buchla.
This tutorial was created by Brian Crabtree for monome.org. Huge thanks to Raja for his very extensive Monoming with SuperCollider Tutorial.
Contributions welcome. Submit a pull request to github.com/monome/grid-studies-sc or e-mail info@monome.org.